Switching from a single node to a repeating nodes structure is a case I have frequently answered with BizTalk. BizTalk and his mapping toolbox allows to get these transformations easily . Usually, you will need to do that when you’ll have to get a target message with a key value pair structure.
This post illustrates how BizTalk maps, and more precisely Table looping and Table Extractor functoids are helpful to achieve it. All the sample here have been realized with Microsoft BizTalk 2013 R2 and Visual Studio 2013.
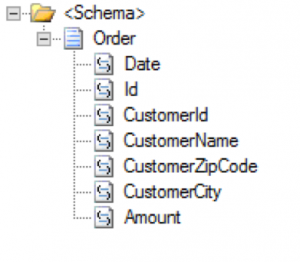
Below, you’ll find the two schemas we will work with all along this post. The BizTalk map we are making will transform a message from the schema on the left to the schema on the right.
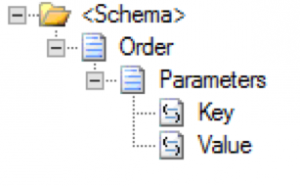
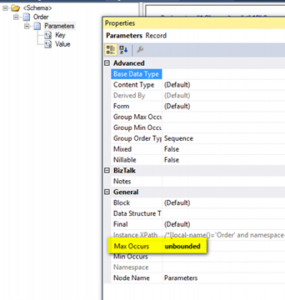
Let’s have a look to the target schema and see that the node “Parameters” is a repeating node.
Ok, we now focusing on our map. First of all, I have selected the source and the target schemas and dropped the Table Looping functoid from the Toolbox into the BizTalk mapper.
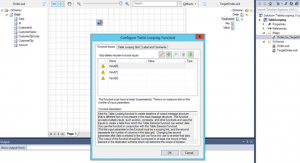
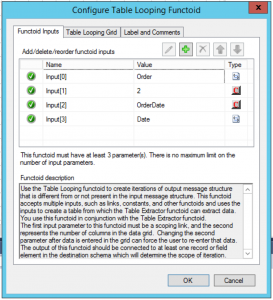
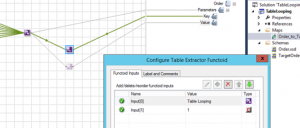
The Table Looping Functoid takes the first two parameters as defined below :
After these two parameters, all parameters given to functoid will be used to populate the data table.
So, to fill the configuration properties of the Table Looping functoid, we are using the “Order” node from source schema to define the scope and we type the value “2” in the second input parameters as we want a table data with 2 columns. The first column will contain the key of our data and the second the value of the source node.
The first step of the functoid configuration is :
Once all of these steps are done, our configuration panel should look like this :
For now, you should understand that the Biztalk mapper will handle only the first node of our source schema. To finialize Table Looping configuration, we just need to repeat step 3 and 4 for all nodes of our source schema. For the links or the labes manually given as input parameters to the Table Looping functoid, the ordering doesn’t really matter. Just be sure to make it easily readable for you.
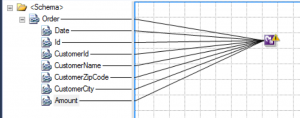
As we can see, I have linked all the source properties to the Table Looping functoid. Of course, I also have set all the keys for the target schema. Before linking data to the target schema, we have to define our data table. Indeed, we have linked the source data to the functoid, but we have to say to the Table Looping functoid how it has to organize the data inside the data table. To achieve that, we just choose the data in second tab of the configuration panel.
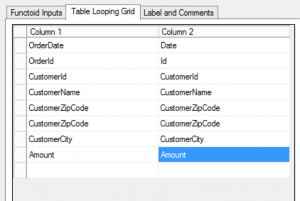
It’s now easy to understand that the first column of our table contains the key where the second contains the value.
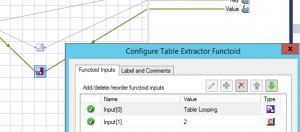
Next step is to extract these data and send them to the target message. Just add 2 “Table Extractor” functoid to the map.
Inside our Biztalk map, each Table Extractor functoid must have 2 parameters defined :
Here is my first Table Extractor functoid configured :
And then the second one :
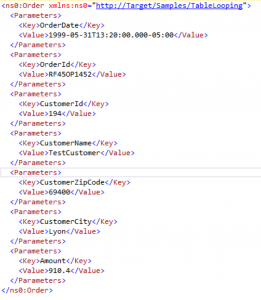
That’s it! Everything is ready to test. Using the message below:
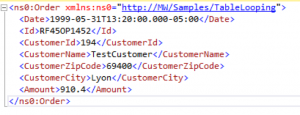
give us the following result: