
Azure’s Standard Logic Apps offer a high-performance platform for orchestrating and automating workflows in the cloud. It provides a wide variety of ready-to-use connectors for integrating services and applications. In this guide, we will see how to deploy them quickly and efficiently with the help of Bicep, a deployment language for your infrastructure as code in Azure. It greatly simplifies the deployment and management of Azure resources.
Knowledge of Standard Logic Apps and the Bicep language is a plus for following this tutorial. You can also find additional information on these two topics on our blog.
I recommend using Visual Studio Code with the Bicep extension.
To be able to deploy a Standard Logic App from one environment to another, it is first necessary to deploy the container. In reality, since the Standard Logic App is built on the Azure Function stack, the components to be deployed are very similar:
Similar to Azure Functions, which can share the same plan, we can then deploy several Standard Logic Apps on this plan.
For our example, we will start with a Standard Logic App that enables data insertion into Salesforce. We assume that all the Azure resources our Standard Logic App depends on will already exist in the target environment. For a complete overview, we will add instrumentation via App Insight to our service.
First, we need to create a new Bicep file, which we will name after our Standard Logic App. Then, we will structure our Bicep into three parts:
Here is an example with the necessary variables to meet our context:
param location string = resourceGroup().location

param targetEnv string

param logicAppName string = 'lap-test-'
param localStorageName string = 'stolaptest'
param appInsightName string = 'ain-shared-'
param plaName string = 'pla-shared-'
param ressourceGroupSharedName string = 'rg-shared-'
param apiSalesForceName string = 'salesforce'
param apiSalesForceResourceGroupName string = 'rg-salesforce-'
The other variables are constants whose final value will depend on the target environment.
Next, we can create references to our dependencies and manage the part that allows us to create our Standard Logic App container. Here’s the final overview of our file:
param location string = resourceGroup().location

param targetEnv string

param logicAppName string = 'lap-test-'
param localStorageName string = 'stolaptest'
param appInsightName string = 'ain-shared-'
param plaName string = 'pla-shared-'
param ressourceGroupSharedName string = 'rg-shared-'
param apiSalesForceName string = 'salesforce'
param apiSalesForceResourceGroupName string = 'rg-salesforce-'

resource storageAccount 'Microsoft.Storage/storageAccounts@2022-09-01' existing = {
  name: '${localStorageName}${targetEnv}'
  scope: resourceGroup()
}

resource appInsight 'Microsoft.Insights/components@2020-02-02' existing = {
  name: '${appInsightName}${targetEnv}'
  scope: resourceGroup('${ressourceGroupSharedName}${targetEnv}')
}

resource sharedPla 'Microsoft.Web/serverfarms@2022-09-01' existing = {
  name: '${plaName}${targetEnv}'
  scope: resourceGroup('${ressourceGroupSharedName}${targetEnv}')
}

resource salesForceApiConnection 'Microsoft.Web/connections@2018-07-01-preview' existing = {
  name: apiSalesForceName
  scope: resourceGroup('${apiSalesForceResourceGroupName}${targetEnv}')
}

resource logicAppTest 'Microsoft.Web/sites@2021-02-01' = {
  name: '${logicAppName}${targetEnv}'
  location: location
  kind: 'functionapp,workflowapp'
  identity: {
      type: 'SystemAssigned'
  }
  tags: {
      Env:targetEnv
      application: 'Test'
  }
  properties: {
      httpsOnly: true
      siteConfig: {
          appSettings: [
              { name: 'APP_KIND', value: 'workflowApp' }
              { name: 'APPINSIGHTS_INSTRUMENTATIONKEY', value: appInsight.properties.InstrumentationKey }
              { name: 'APPLICATIONINSIGHTS_CONNECTION_STRING', value: appInsight.properties.ConnectionString }
              { name: 'AzureFunctionsJobHost__extensionBundle__id', value: 'Microsoft.Azure.Functions.ExtensionBundle.Workflows' }
              { name: 'AzureFunctionsJobHost__extensionBundle__version', value: '[1.*, 2.0.0)' }
              { name: 'AzureWebJobsStorage', value: '@Microsoft.KeyVault(SecretUri=https://kv-shared-${targetEnv}.vault.azure.net/secrets/StorageAccount--ConnectionString/)' }
              { name: 'FUNCTIONS_EXTENSION_VERSION', value: '~4' }
              { name: 'FUNCTIONS_WORKER_RUNTIME', value: 'node' }
              { name: 'salesforce-apiId', value: '/subscriptions/${subscription().subscriptionId}/providers/Microsoft.Web/locations/${location}/managedApis/salesforce' }
              { name: 'salesforce-connectionId', value:'/subscriptions/${subscription().subscriptionId}/resourceGroups/rg-salesforce-${targetEnv}/providers/Microsoft.Web/connections/salesforce' }
              { name: 'salesforce-connectionRuntimeUrl', value: salesForceApiConnection.properties.connectionRuntimeUrl }
              { name: 'WEBSITE_CONTENTAZUREFILECONNECTIONSTRING', value: '@Microsoft.KeyVault(SecretUri=https://kv-shared-${targetEnv}.vault.azure.net/secrets/StorageAccount--ConnectionString/)' }
              { name: 'WEBSITE_CONTENTSHARE', value: toLower('${logicAppName}${targetEnv}') }
              { name: 'WEBSITE_NODE_DEFAULT_VERSION', value: '~16' }
              { name: 'Workflows.my-workflow.FlowState', value: 'Enabled' }
          ]
          use32BitWorkerProcess: true
      }
      serverFarmId: sharedPla.id
      clientAffinityEnabled: false
  }
}
In this part, we can:
Deployment of the Standard Logic App Container
Now, via GitHub, we need to create a new yaml pipeline to execute our deployment file. Here is an example of a yaml file that allows the deployment of our Standard Logic App:
name: Deploy laptest
on:
  push:
    branches:
      - main
jobs:
  build-and-deploy:
    runs-on: ubuntu-latest
    steps:
      - name: Checkout_Repo
        uses: actions/checkout@v3
      - name: Log in with Azure
        uses: azure/login@v1
        with:
          creds: ${{ secrets.az-deploy-credentials }}
      - name: Set up Azure CLI
        uses: azure/CLI@v1
        with:
          azcliversion: 2.0.72 # Choisissez la version appropriée de l'Azure CLI
      - name: Deploy laptest to staging/rg-test
        run: |
          az deployment group create --subscription ${{ secrets.az-subscription-id }} --resource-group rg-test --template-file LogicAppWorkspace/laptest.bicep --parameters LogicAppWorkspace/laptest.parameters.staging.json
This is a fairly simple and straightforward approach. Ideally, one should create a yaml file that would be used solely for deploying Bicep files and have other yaml files specific to each resource that would call it, providing the necessary information for its processing.
The part allowing us to deploy the container is finished. Now, we need to take care of the workflows.
To deploy the workflows, we need to create a Standard Logic App project. The simplest way is to go to the ‘Overview’ section of our Standard Logic App and download the existing one:
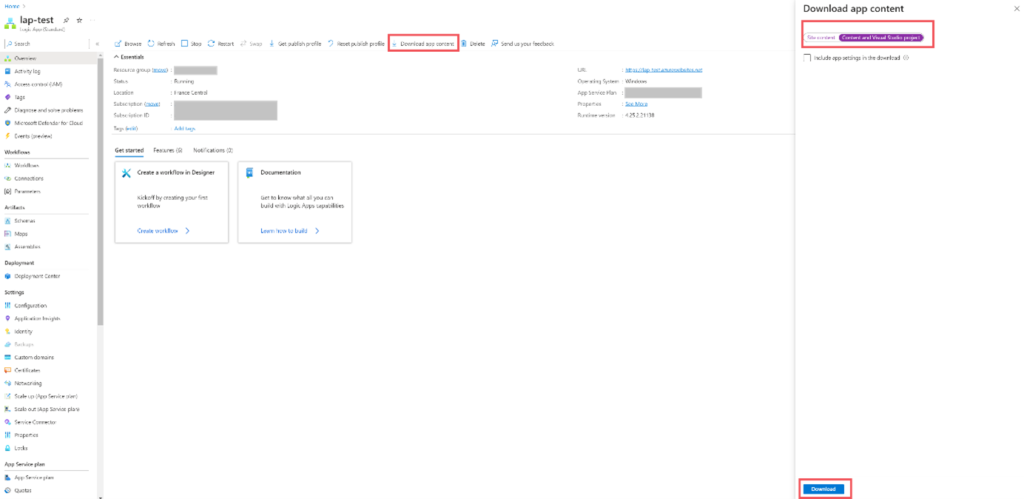
Once the download is complete, we will find an archive containing:

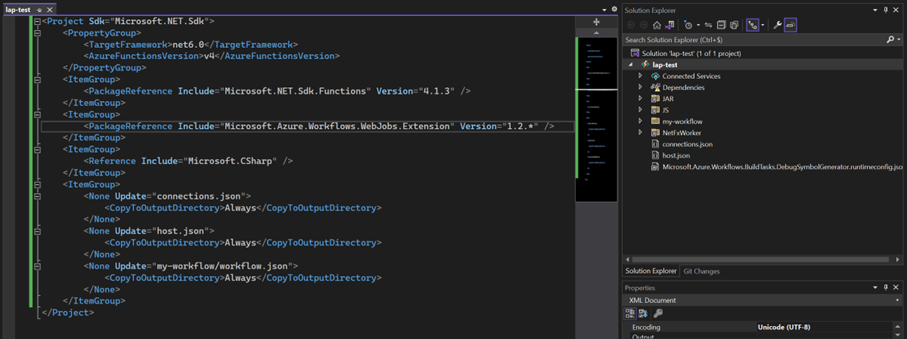
For the next steps, I recommend using Visual Studio to compile your project to ensure there are no issues:
To add new workflows, you need to declare them here so that they are correctly taken into account during deployment. Then, we need to set up the process that will allow us to deploy them.
For this, it is necessary to create a pipeline in GitHub again:
name: Deploy lap-test workflows
on:
  push:
    branches:
     - main

 # CONCURRENCY SETTINGS
concurrency:
  group: ${{ github.ref }}
  cancel-in-progress: true

jobs:
  build-Azure-Function:
    name: Build Azure Function
    runs-on: ubuntu-latest
    steps:
      - name: Download Sources
        uses: actions/checkout@v3
      #Setup .net
      - name: Setup .Net
        uses: actions/setup-dotnet@v2
        with:
          dotnet-version: 6.0.x
      - name: Setup NuGet
        uses: NuGet/setup-nuget@v1.0.6
      #create package
      - name: Create package artifact folder
        shell: pwsh
        run: |
          Write-Host "Create Function folder"
          New-Item -Path ".\artifact-function" -ItemType Directory

      # BUILD PROJECT
      - name: Build & Scan Project
        shell: pwsh
        run: |
          Write-Host "Build Solution..."
          dotnet publish ".\LogicApps\lap-test\lap-test.csproj" --configuration "release" --self-contained --output "artifact-function"
       #UPLOAD ARTIFACT
      - name: Upload Artifact - Function
        uses: actions/upload-artifact@v3
        with:
          name: function
          path: artifact-function/
          if-no-files-found: error

  deploy:
    runs-on: ubuntu-latest
    needs: [build-Azure-Function]
    steps:
      - name: Checkout
        uses: actions/checkout@master
      - name: Login to azure
        uses: azure/login@v1
        with:
          creds: ${{ secrets.az-deploy-credentials }}
      #Deploy function
      - name: Download Artifacts
        uses: actions/download-artifact@v3
        with:
          name: function
          path: function
      - name: Deploy Function
        uses: azure/functions-action@v1
        with:
          app-name: lap-test-staging
          package: './function'
Once your pipeline is launched without error, you should find your workflows in your Standard Logic App on your target environment.
However, please note that in this example, we have currently disabled the deployed workflow (status ‘disabled’), because we specified in the Bicep file, using the parameter ‘Workflows.my-workflow.FlowState’, to set it in inactive mode.
Furthermore, our Azure resource will be in ‘read only’ mode, so it will be impossible to make modifications in any environment other than development.
In this article, we demonstrated how to deploy a Standard Logic App using the Bicep deployment system and GitHub for our pipelines. Ultimately, we can conclude that the deployment of this Azure resource should be done in a way that is relatively similar to Azure Functions Apps and Azure Functions, dividing it into two steps:
In my opinion, Bicep offers a deployment system that is much more readable and understandable than the standard ARM. Thus, the management of API connections and dependencies is greatly simplified.
Although their deployment is more complicated than consumption-based ones, Standard Logic Apps allow for greater flexibility, better management, and anticipation of costs