In a previous article, I shared the configuration of the OAuth Client Credentials flow with Azure AD. The configuration of the OAuth Authorization Code flow with Azure AD is similar to that one. It’s done directly from the Azure AD interfaces and doesn’t require you to write any code. This post presents the manual steps for configuring the OAuth Authorization Code flow with Azure AD. However, it is possible to script all these operations to automate them.
I won’t describe the various stages of the OAuth Authorization Code flow, as there are countless articles online. However, I suggest this one if you need in-depth information: https://auth0.com/docs/get-started/authentication-and-authorization-flow/authorization-code-flow. Unlike the Client Credentials flow, this flow is essential when a user is involved and available. In practice, a person uses an application (e.g. a web app) and wishes to access a resource (e.g. an API). A trusted third party (Identity Provider or IDP) manages the user’s access authorization to this resource. The web application must ask the user to authenticate with the IDP. At the time of authentication, the user consents to the application using his identity and authorization to access the resource. This is known as “identity delegation”.
To illustrate how this is done on Azure AD, I’ll give you an example based on 2 applications:
An API (server) that exposes APIs and manages permissions on them
An application (client) that wishes to consume resources under the identity of a user.
Personally, I’ve added 2 App Registrations to my Azure Active Directory: the first to manage the identity of my server (API), the second, that of my client (web application):

First, let’s configure the App Registration Server (SampleAPIServer). At a minimum, I’m going to set up :
The scope is required to control the range over which the application can request identity delegation. Remember that the application is asking the user for the right to use its identity, and this use will be limited to this scope. App roles, on the other hand, are useful for determining the actual roles of the underlying user.
The scope is configured in the “Expose an API” section :
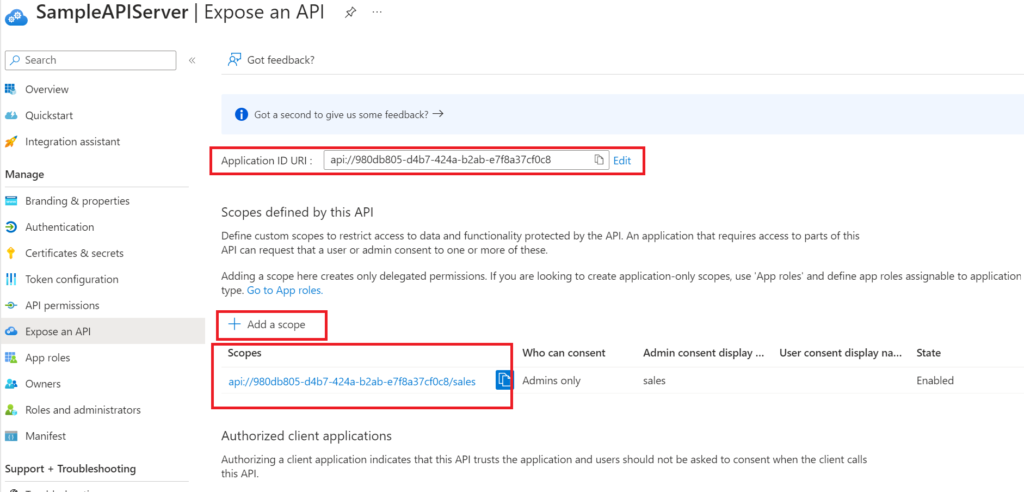
If you don’t have a URI for your App Registration, you’ll need to define one (not necessarily consisting of a GUID). Then use the “Add a scope” button to add a scope. Mine is called “sales”.
You can change the consent management from “Admins only” to “Admins and Users” if you want non-Admin users to be able to consent to the use of the application.
App Roles are configured in the “App Roles” section.

To create an App Role, use the “Create app role” command. A panel appears on the right of your screen. In this panel, you need to enter a label. Next, I select the type of member authorized to use this role. To set up user permissions, you must at least choose the “User” type. In the screenshot above, I select “Both”, which includes users and applications. My role can then be assigned to a user and/or an application.
Next, give this role a value. This value is the one that will be transmitted in the JWT token. The label does not have to be identical to the value. Finally, give a description of the role to validate its creation.
Now that we’ve finished configuring the server, we’re ready to configure the App Registration Client. To do this, we’ll set :
The return url is configured in the “Authentication” section of the App Registration management screen. It is necessary to add a target platform, in my case Web.
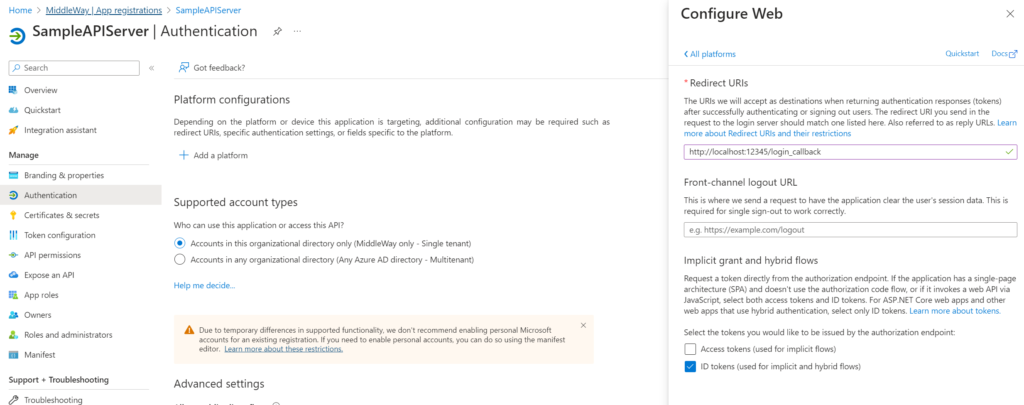
Be sure to check the type of token you wish to generate when requesting authorizations (in my case “ID Tokens”).
You need to authorize the client application to request tokens on behalf of a user (delegation). To do this, use the “API Permissions” tab on the App Registration Client management screen (in my case SampleAPIClient). Then click on “Add a permission” to associate a scope with your client application.
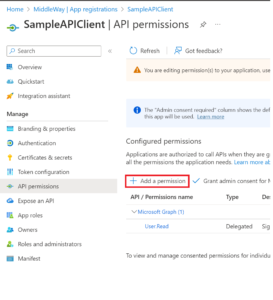
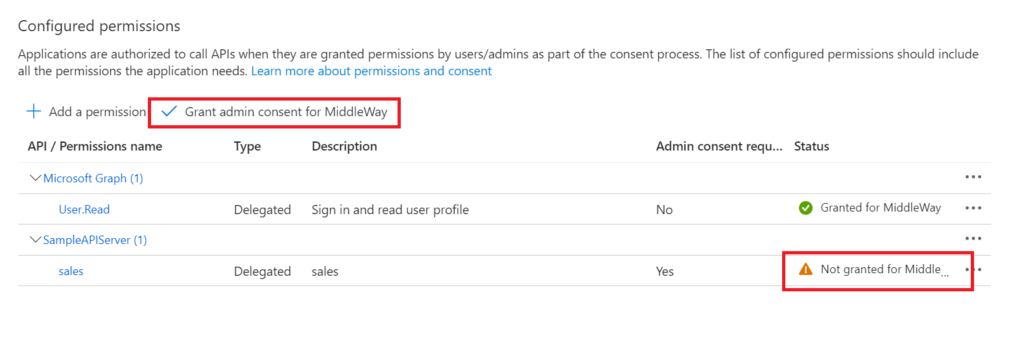
After clicking on “Add a permission”, a panel appears on the right. Find your API via this panel. If you’ve added the App Registration server yourself, you’ll have quick access via the “My APIs” tab. Once you’ve chosen your server API, you’ll need to select the type of permission to be granted. In our case (Authorization code), you need to choose “Delegated”. On this screen, you must select the permissions you wish to grant to your client. In my example, I’ll use the “sales” scope.

After validating the permissions assignment, a “warning” indicates that an administrator is required for validation. Click on the “Grant Admin Consent” command to confirm the association of the scope with the client application.
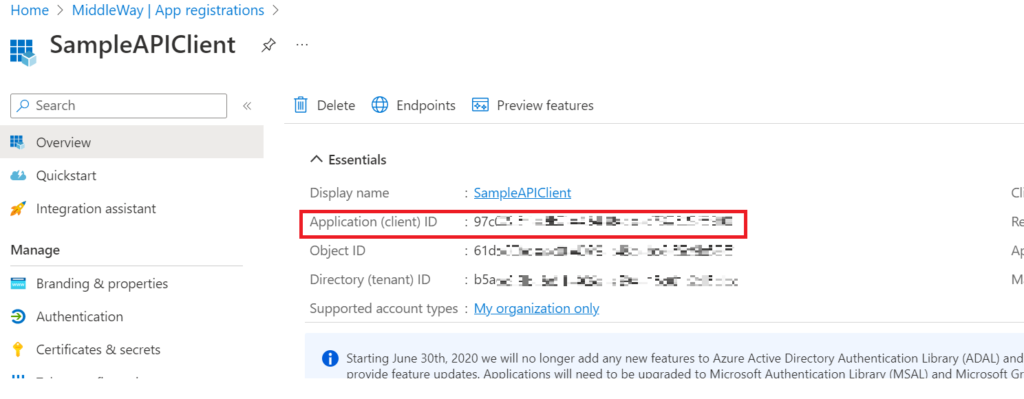
To comply with the OAuth Authorization Code standard, the client application must provide a client ID and secret to obtain a JWT token. The client ID can be obtained from the “Overview” screen of the App Registration Client.
The client secret can be added from the “Certificates & secrets” tab, by clicking on the “New client secret” command. And don’t forget to copy and paste this secret, as it will only appear once on your screen. Finally, note that the secret must have an expiration date to guarantee rotation. By default, Microsoft recommends an expiry date of 6 months. It is essential to define reasonable lifetimes to maintain a high level of security.
Now that App Registrations have been initialized, it’s time to assign roles to users. These roles can be used by the client application to identify user rights. These roles are assigned via Azure AD interfaces. To do this, go to the “Enterprise Applications” screen in Azure AD (not to be confused with “App Registrations”). Find the Enterprise Application that corresponds to your server and navigate to the “Users And Groups” tab. From this screen, you can add rights to any user.
In my example below, I’ve personally assigned myself 2 roles.

To test the configuration, you first need to request an authorization code. Detailed documentation is available at https://learn.microsoft.com/en-us/azure/active-directory/develop/v2-oauth2-auth-code-flow#request-an-authorization-code. Personally, using a browser, I used the following url (replace the tokens with the corresponding values):
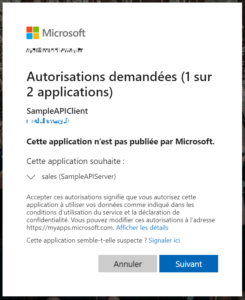
Note the presence of the “prompt” parameter. Its effect is to propose the consent window on the first token request. In addition, the user must validate the delegation of his identity to the application. In the following screenshot, the user is warned that the “SampleAPIClient” client will use identity delegation on the “sales” scope of the “SampleAPIServer” application.
Once authentication has been validated, the user is redirected to the client application (at the url defined by the redirect_uri parameter). The authorization code used to request the JWT token is then transmitted as an http parameter. To request the access token from the code, a POST must be made to the url: https://login.microsoftonline.com/{tenantId}/oauth2/v2.0/token with the following body:
client_id={client_id}&code={body}&grant_type=authorization_code&redirect_uri=http%3A%2F%2Flocalhost%3A123%2Flogin_callback&scope={scope}&client_secret={client_secret}
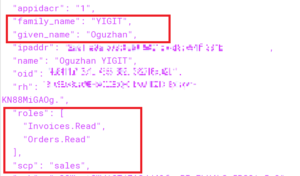
In return, you get the access_token. When I decode mine, I observe the presence of the user (last name, first name, email…), the scope and the associated roles: