
In every API management tool, you must make a distinction between frontend authentication (or façade, ie: that exposed to the API consumers) and backend authentication (that exposed by the backend service). One the advantages of such a tool is its ability to decouple both levels of security, and by so doing abstract and hide the backend security for the API consumer.
Backend authentication can be managed in Azure API Management by using policies.
NOTE: as a very rough summary, policies are a scripting feature that enables us to customize and extend the way requests and responses are processed by APIM.
More information on policies here and on policy expression syntax there.
At the time this post is being written, available backend security policies are limited to:
Let’s see how to handle a third authentication mechanism: authentication with Shared Access Signature.
What for: Concretely and in the context of APIM, to expose an Azure resource or service (an Azure Service Bus Queue fo the sake of this example) as a service and hide the security requirements at the same time.
Theory: a SAS is a security mechanism used to grant and delegate the access to an Azure resource without requiring to share the primary or secondary security keys of the owner account. It relies on:
Detailed information is available here.
In order to create a policy, we first need to connect to the Publisher Portal or the APIM instance (NOTE : at the present time, Microsoft is migrating the Publisher and Developer portals features one by one in the standard Azure portal, so by the time you read this, you not even have to bother connecting to anything else than the Azure portal)
Let’s do things right from the beginning: instead of hard-coding the SAS authentication parameters, we’ll create properties that will contain the values for those parameters, which will allow us to isolate the authentication logic (the policy itself) from the configuration (the properties).
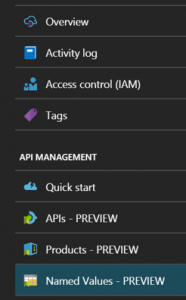
Properties are now accessible in preview in the Azure portal under Named Values (but they are still accessible in the Publisher portal in the Properties section):
To add a property, click Add:

Then fill in the following information (beware of the case for the property name: by default, the portal lowers the case of whatever you put in Display Name) for each property:
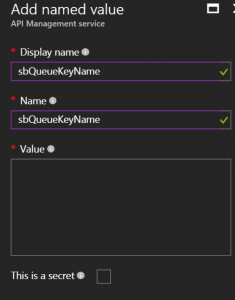
The properties that need to be created are:
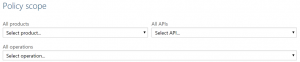
Policies themselves are managed in the Publisher portal in the Policies section. Policies can be applied at 4 levels depending on the desired scope for the policy:
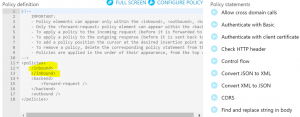
Whatever the level, all the following customizations are to be placed in the inbound section :
The solution is made of 3 parts :
A variable can be defined by using the set-variable policy :
<set-variable name=”resourceUri” value=”{{sbQueueURI}}” />
<set-variable name=”sasKeyName” value=”{{sbQueueKeyName}}” />
<set-variable name=”sasKey” value=”{{sbQueueKeyValue}}” />
An HTTP header can be added by using the set-header policy. The one we are interested right now is Authorization.
This policy has an exists-action parameter that enables us to configure the behavior in the case the header already exists in the inbound request. In our case the client is not supposed to send this header, so we can simply overwrite it:
<set-header name=”Authorization” exists-action=”override”>
<value></value>
</set-header>
The header value can be set by using an expression in the value element of the set-header policy.
The following script calculates the token based on the SAS authentication parameters. The value of the properties defined earlier are retrieved with the following instruction:
string myVariable = (string) context.Variables.GetValueOrDefault(“<variablename>”);
The complete policy is as follows:
<set-header name=”Authorization” exists-action=”override”>
<value>@{
string resourceUri = (string) context.Variables.GetValueOrDefault(“resourceUri”);
string sasKeyName = (string) context.Variables.GetValueOrDefault(“sasKeyName”);
string sasKey = (string) context.Variables.GetValueOrDefault(“sasKey”);
//set the token lifespan
System.TimeSpan sinceEpoch = System.DateTime.UtcNow.Subtract(new System.DateTime(1970, 1, 1));
var expiry = System.Convert.ToString((int)sinceEpoch.TotalSeconds + 60); //1 minute
string stringToSign = System.Uri.EscapeDataString(resourceUri) + “\n” + expiry;
System.Security.Cryptography.HMACSHA256 hmac = new System.Security.Cryptography.HMACSHA256(System.Text.Encoding.UTF8.GetBytes(sasKey));
var signature = System.Convert.ToBase64String(hmac.ComputeHash(System.Text.Encoding.UTF8.GetBytes(stringToSign)));
//format the sas token
var sasToken = String.Format(“SharedAccessSignature sr={0}&sig={1}&se={2}&skn={3}”,
System.Uri.EscapeDataString(resourceUri), System.Uri.EscapeDataString(signature), expiry, sasKeyName);
return sasToken;
}</value>
Once everything is saved, we can test the API with a tool such as Postman. The response returned by APIM should be wonderful :

And the queue should contain a new message.
This mechanism can typically be used to receive webhooks from an external system and store them in a Queue, thus decoupling the pure messaging mechanism from the processing of the hooks.
Nevertheless, don’t forget to pay attention to the façade security! In this scenario, you could leverage the following complementary mechanisms: